
"Pulling out isn’t as much fun than leaving it in there, but sometimes it is safer”

The Bolting Bible
The Book of Pulling Out

Welcome to our free course as our way of contributing to the bolting community. It's nice to understand what you are clipping and trusting with your life, even if you never plan on installing or removing bolts. We believe that if someone is going to spend their time and money to bolt something, they probably want to do it as good as possible. Hopefully, the Bolting Bible gives you the tools you need to do a great job. Get it?
This book is in a blog format. The main blog points to all 17 chapters, and at the end of each chapter, it points you to the next. A downloadable pdf is available HERE.
Pulling Out Can Be Safer

You’re about to hit the crux and you get to a bolt that looks more sketch than a 000 cam in wet sandstone on Friday the 13th. Unfortunately, some bolts installed do not pass the test of time and need to be replaced BEFORE they kill someone. It’s not ideal to have a bolt pull out while you are in the midst of using it, but when our bolting angels go to replace bolts, they can be tricky to remove in such a way that the hole can be reused. This chapter talks about all the different ways to remove old bolts.
Precious Trash
Ethics are important when re-bolting. Retro-bolting is when you add bolts to an existing climb. This is frowned upon by most of the climbing community but in some situations this can be done to improve the quality of the climb or make it safer, if the F.A. (first ascensionist) is consulted or if they are unavailable, community consensus is obtained. The goal of rebolting is to reuse every hole so our rocks don’t turn into swiss cheese.

If quality stainless or titanium bolts are used, then no one in our lifetime should have to change them, except for the high use lower offs where the rope grinds through the metal over time, but that is just a maintenance thing.
If bolt holes are not reusable, there are several ways to fill them so they don’t show much. You can use glue you already have if you are installing glue ins and apply dust and pebbles you have collected from the new hole you drilled. If you aren’t using super red hilti glue and properly apply the dust, this can camouflage it well.

Another option is any epoxy putty like Pool Epoxy or Damn Good Putty at about $9. May brands have many colors to match the rock type you are using. You knead the two parts together, shove it in the hole, camouflage it with tiny rock chips or sand on top or even mix some into it as you kneed it, and it is as hard as the rock in 20 minutes. Any two part epoxy putty can work. LamLock Rocket Gel comes with the two parts and then 8 color bottles to get fancy if your rock isn’t boring and grey, but this is expensive and bulky. InstaCrete is another great option and is only about $14. Clear silicone, in a squeeze bottle, can also be used if you smash a small pebble into hole after filling it with the silicone. Keep in mind the silicone and even clear epoxies, can yellow over time, so consider your rock color when doing this.
If you are using a mechanical bolt that relies on the hole being the correct size, you may have to drill the hole to the next size up. Oftentimes you are replacing a ⅜” (10mm) bolt and so you just go to ½” (12mm) for a fresh hole. Sometimes the bit can get jammed in there and so you have to baby it. If you are installing a glue in, then as long as it is the right size hole, not being perfectly cylindrical doesn’t matter. However, additional drilling might be required if you need a notch.
Chop Chop

Some bolts can’t be saved. They are so corroded the heads will snap off way before you could get the shaft out of the rock, or they get stuck as you try to extract them.

Chopping usually is the term used for removing bolts in general and doesn’t mean an ax is used, but this can mean use brute force to wack it back and forth so much it breaks. On really rusty bolts, once the hanger is removed, hammering the stud back and forth just two or three times, stress bends it where it contacts the rock and it breaks right off.

Just know you aren’t reusing that hole. See an example HERE. Bigger bolts with more substance can be cut off if you can’t use the techniques we explain below. The lightest and simplest way to do this is using a metal cutting hacksaw blade. Attach key rings to each side as handles. You can also use a battery powered angle grinder or Sawzall or get a wheel adapter that works on your drill called a Mandrel. This can be tricky to get under the hanger and/or not grind a half circle out of the rock. You can cut the bolt head off above the hanger, then remove the hanger and try to smash the bolt into the hole flush with the rock. Don’t make cut marks on the rock!
Sometimes you can just “over tighten” the bolt with a 18” breaker bar and ping! The head will snap off and will be ready to patch. SS studs break pretty easily, carbon steel has more elasticity and tends to be harder to snap. 5 piece bolts tend to spin in the hole before breaking. Either way this gives you insight on why we shouldn’t over tighten them when installing!


FANCY TIP: To leave less of an impact and to prevent our rocks from turning to swiss cheese, you can bury the old bolt under the notch of the new one if you are using a glue in as you can see in this photo above.

You need to pound the bolt slightly below the surface to do this and some might be concerned about a compromised strength but after breaking hundreds of bolts, I can’t see how that is possible. We will be sure to test this in BoltBusters.
Forking up - Button Heads

This is like chopping but with more finesse. A tuning fork, commonly made from pitons, literally wedges the bolt out. You start with quite thin blades then progressively work up to thicker ones and even stack them until the bolt is free. Of course a big enough crow bar would probably also work. Forking up is more common on bolts that can’t have drills attached to them or adapters + extractors such as button heads. I have used this method in Yosemite where drills are not allowed.
Be mindful not to damage the rock. Granite can sometimes take a beating but softer rock can get scared if you are too aggressive on it. A paint lid or sheet metal works or if a piece of wood if you are using a lever like a crow bar.

It can be assumed that if you are trying to replace a bolt, you care about the end result looking nice, so be mindful about keeping the rock nice. In this episode we use piton forks to remove some old bolts.
Roll up your sleeves - Powers 5 piece bolts

Powers 5 piece bolts can be unscrewed and the core bolt removed, however the sleeve and nut is still stuck in there. Even though the nut fits snug in the hole, if the sleeve wasn’t in the way, the bolt can be reinstalled and used to pull out the nut. The trick is removing that sleeve! With enough tears and patience, you can try using needle nose pliers to pull it out, hook it from the bottom, or smash and drill it into pieces with a concrete bit and your rotary hammer. If you are trying to grab the nut at the bottom after removing the pesky sleeve, then don’t bust your nut up. You can pull the reinstalled bolt with a bolt removal tool that we discuss below, or just attach a shit hanger to it and use a funkness device (hammer with sling attached to head), or grind it to a pulp and blow it out and use a magnet tool.
Spinning (Step 1 of 2) - Wedge bolts
This is step1 of a 2 step process. Wedge bolts can be spun to create a grove next to the clip at the base, stopping the clip from expanding and being able to “just” be pulled out. Adding water helps mix with the dust to create an abrasive paste at that point of contact. If you want to really get gritty, you can use 240 grit aluminum oxide sand blasting powder in a squirt bottle so you can get groovy faster.

It can be tricky to get the right adapter to fit your drill AND the threads on the bolts. Once the bolt hits the set screw, inside the adapter, the bolt stops threading deeper inside the adapter and starts to spin the bolt itself. If the coupler touches the rock then the bolt won’t spin. As you drill you push and pull like you are truly screwing the rock.

Powered spinning: If you use the rotary hammer drill you probably already have with you, then you need an SDS adapter to generally a male threaded end. Then you put a coupler on that which is female on both sides that goes on the male… ok i’ll hold back the jokes. If you want more torque, you can use a 3/8" impact driver and that just requires a different adapter.


Manually spinning: Why on earth would you spin a bolt manually??? National Parks in the US don’t allow power drills even if you are a do gooder who wants to re-bolt (some permits are available in some areas). This video shows the spinner tool that Dan Merrick modified for bolt spinning. It is a speed wrench + universal joint socket that goes over the coupler nut + coupler nut (with course threads!). These components need to be secured together because you will be pulling out while spinning it. There needs to be a set screw inside the coupler (or an extra nut on the bolt) because if the bolt doesn’t bottom out in the back of the coupler it just pulls the bolt tighter against the clip instead of spinning it.
Extracting (part 2 of 2) - Wedge Bolts
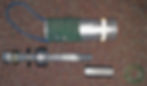
Even with the base of the bolt compromised, it can still be surprisingly difficult to pull the bolt out. However, mechanical advantage can come in a small package. A giant screw inside a hollow tube is light and affordable, or a small hydraulic pump, that works very much like a car jack, gives so much advantage you have to pump carefully in order not to snap the bolt. If done correctly, there will be a clicking sound as the bolt comes out a little bit at a time. And if the tool doesn’t have enough lifting distance (throw), then you just reset it and put in a spacer and do it again. No one needs the BoltBusters crazy hollow ram puller unless you are trying to be dramatic! Something I learned with BoltBuster is more power isn’t always what you want. Technique is important or you just end up snapping the bolt and then the hole cannot be reused.
Giant Screws
Doodad 4.0
Greg German (Gregger Man) has developed a Doodad bolt extractor that is a like a giant screw inside of a pipe or square tubing with an adapter on the end that gets attached to the threads on the bolt you are trying to remove. The giant screw pulls up on the bolt while and the outer pipe or square tubing pushes against the rock, sucking the bolt into the square tubing. You can see plans and material list HERE. Watch Greg show you how to make one on his video or him using an older version in this video and him explaining about it in this video.


YABR - Yet Another Bolt Remover


Greg German made his Doodad commercially available if you just want to just BUY IT and it's called the YABR. You can watch us use this tool in this EPISODE. We also pulled tested it in this EPISODE to see how much force you can get from this device and we got over 23kN! That just shows how important it is to score the nut at the bottom by spinning the bolt first so it doesn't break the bolt itself which can easily happen at those forces.


Hurley Junior

The Hurley Junior can also be either homemade or ordered from Access Fund and is a more compact screw type bolt extractor. This is another good video showing the tool.

.
Larry Shaver’s $10 Bolt Remover

If you want a cheap solution similar to the Hurley Junior, you can grab a coupler nut (the tall looking nut) that matches your bolt (example below is ⅜”) and use a cut off hex bolt with partial threads to screw into coupler. The extra nut locks it all up and allows you to spin the bolt with a normal drill with a chuck if you have that with you. Downside might be that you don’t have a normal drill with a normal chuck with you.
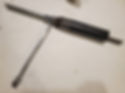
Then you can remove the cut up hex bolt and insert a long threaded rod in it using a black pipe as a spacer to then extract the bolt using a long wrench as your leverage. It takes some spacers, washers, and extra coupler nuts as you can see in these images. Ideally you can get all these parts attached to some cord so you don’t risk dropping it or the spare pieces or use a bolt bag.
Hydraulic Pumps

The outer part stays against the rock and the inside gets sucked up with hydraulic action. Hydraulics are amazing and that is how we do all our break tests in BoltBusters but we oversized everything for dramatic affect.

The Greenly Hydraulic Punch Driver is designed to pull dyes together to cut holes in sheet metal and can pull up to 7tons.
It is super handy and comes at the low low price of a condo in Thailand, but luckily at $923 it comes with free shipping! If weight isn’t an issue, it is an amazing tool at 14lbs with the adapters. Unless you have BoltBuster’s hollow cylinder, these tools just don’t have much stroke, so you pump a little, reset, place a spacer under it and repeat. Hollow cores can also have adapters attached but require a hose and small hand pump but that isn’t practical on a cliff face. You can watch the Access Fund use the Greenly in this video.
Getting Hot - Glue In Bolts

Glue, in theory, can be heated up with a blowtorch and then pulled out. We say theory because it’s really hard to get the glue 4” down or even further hot enough to become weak enough to remove easily. If you can get the bolt out, then you can drill out the remaining glue and reuse hole. Try not to have too many flames next to your climbing ropes if you are hanging around while doing this! We have yet to be successful with this method.
Micro Core Drill - Glue In Bolts
Drill a very tiny hole around the sides of the glue in to loosen the glue until it becomes free. Drilling an equal size hole next to it doesn’t really solve a lot since the rock is now compromised and you still have two holes at the end.
Getting Twisty - Glue in bolts

Crowbar in the glue in + twist = done. This can be hard to get some bars in the glue in’s small space or the glue in head can wrap around the bar so you can’t get it off without other tools. Also, this method is more likely going to break the bolt instead of disengaging it from the glue.
The Access Fund has a great bolt removal page that dives into detail on even additional bolts not covered here and has lists and kits you can reference in these photos here.


DON’T SUCK!
Bolts that you tried to remove, but couldn’t, are now compromised. Make sure you can finish what you started AND replace them. Half finished work can be super inconvenient at best or kill people at worse. If you do suck, make the bolt and hanger unusable or put a note on it. Ideally practice at home before!

The Access Fund not only helps keep access to climbing crags, but also helps re-bolting efforts. Check out the "bolt basics" page to see the types of old bolts they are replacing. They are a non profit based in Colorado and focus on replacing bolts in the USA.

ASCA - American Safe Climbing Association’s mission is to replace deteriorating anchors on classic climbs in the US and educate climbers about the public about climbing safety. This link goes straight to their education section about bolts.

What's Next?

You can always go back to the main part of the BOLTING BIBLE HERE
Feedback, typos or more information is always appreciated. HMU at ryan@slackline.com
This course is free but not free to make. If it really helped you, please consider SUPPORTING US.