
“After getting thy hole hammered, make sure thou cleanest it really well.”

The Bolting Bible
The Book of Holes

Welcome to our free course as our way of contributing to the bolting community. It's nice to understand what you are clipping and trusting with your life, even if you never plan on installing or removing bolts. We believe that if someone is going to spend their time and money to bolt something, they probably want to do it as good as possible. Hopefully, the Bolting Bible gives you the tools you need to do a great job. Get it?
This book is in a blog format. The main blog points to all 17 chapters, and at the end of each chapter, it points you to the next. A downloadable pdf is available HERE.
Holes Matter a “Whole” Lot
You have to know where to put them, what pattern to put them in, how to drill them and what diameter they need to be, even sometimes accurate to within 0.1mm. Keep in mind drilling a hole is a permanent deformation to the rock, so be intentional before you swiss cheese our public land. See here all the things you need to know to get your holes drilled out.
Test the spot
After making sure the rock is solid with your hammer, set the hanger (if using hangers) where you think you will drill the hole to make sure it sits flat and nice. If you really like the spot and only a few crystals are stopping you, you can chip them away with a hammer, but just be sure that the end product… the hanger… will sit nicely.
After drilling the hole an ⅛”, stop and check everything again. Do you like the spot? Does your hanger sit nicely? Did the rock feel/sound solid? If you goof, ⅛” isn’t a deal breaker, but if you drill all the way and then realize there was a mistake, then it is just slop.

Drill it straight
Mechanical bolts will have a hanger and it is important that the hanger sits flat against the rock. Drill the hole perpendicular to the rock which can be harder than you realize. Your brain might think you are going in straight and you could be way off. Pay attention.
Glue in bolts have conflicting information online. FixeHardware says in this video to tilt them backwards for leverage. Bolt-Products website (scroll halfway down) did a test showing stakes in the ground do better if installed straight in. If you think glue ins are like ice screws where the threads are supposed to do the work, not the leverage, then you might be tempted to point them in the direction of the pull. So what's right?
Spoiler alert, it doesn't matter. Just put the damn thing in straight and don't over think it. We have broken so much gear trying to break glue ins, that if your glue is mixed well, it's not coming out. The longer your bolt is, the more rock it is holding on to. So if you wanted to get nerdy about it, drilling it in straight grabs more rock. But if your bolt doesn't have an interference fit (gets stuck automatically) and you don't want your bolt to fall out of the hole in a 90 degree wall while the glue is curing, you could also drill it at a slight angle so it stays in place.
Drill the hole deep enough

In almost every situation, there is no such thing as too deep, other than you are wasting battery life/arm power, drill bit life or glue. IT IS VERY BAD IF THE HOLE IS TOO SHALLOW. Just like relationships, if it is too shallow it isn’t going to last. A bolt sticking up out of the rock could be unsafe and difficult to remove. Even at 95% depth it will look like it is in the rock but the hanger will be spinning and that always raises
a red flag on the integrity of the bolt to someone who wants to use it.
If you are installing a wedge bolt, over drilling the depth by 1/2" can be helpful for future replacement if it unfeasible to extract the bolt. It could just be pounded in flush and patched.
TIP: Put duct tape on your drill bit or your wire brush as an indicator that you are deep enough. Lightly scoring your drill bit with a hacksaw blade works as well and doesn’t fall off or move.
Spacing

How close, or far, should the bolts be apart from each other? The force is spread in a cone shape through the rock as seen in this sandstone the broke off during a pull test. If your bolts are too close together, the same sections of rock will be seeing forces from two different bolts. It’s also important to not be too close to areas of the rock that sound hollow or weak when tapped with a hammer. The longer your bolt, the bigger your cone will be, so the further your spacing will need to be. The expansion anchor industry has established a minimum of 10 anchor diameters apart from each other (½” x 10 = 5” or 12mm x 10 =120mm apart minimum) and is talked about in this video and in engineering the standard is 12x diameter. Either way, I’m not sure why diameter has much to do with it when it looks like length affects cone shape more. For most situations, since we use either ⅜” (10mm ish) or ½” (12mm ish), a hand width apart is fine but in softer or fractured rock it is better to spread them out twice as far. Also, this includes edges as a bolt too close to an edge is unsafe. Whether length or girth is more important, stay 5” or 125mm away from any other bolt or edge or hollow sounding rock and you’ll be super bomber enough.

Cleaning the Hole

It has been believed for a long time that it is absolutely critical and essential to clean the bolt hole to be completely free of dust. If you have a pile of dust at the back of your hole, you may not be able to get your bolt in all the way. It is ideal to blow the hole clean and brush it clean but it isn't as life threatening as we all once imagined. When we have done testing, the bolt disengages from the glue way before the glue disengages with the rock. The only time we were successful in getting the glue to fail was with a threaded rod on some Fixe glue ins since the threads grabbed the glue so well but it was over 2x more force than a takes to break the carabiner you are clipping to it. When testing this with mechanical bolts the bolt or hanger snapped before the dirty hole compromised the placement.


We still brush and blow our holes clean as that is the best practice. But if you are on a critical mission and don't have cleaning supplies but have everything else, the hack for mechanical bolts is to over-drill the depth so the pile of dust is deep enough to not get in your way. The hack for glue in bolts is to fill the hole 1/3 with glue and use the bolt to rub/mix the dust with the glue so it pulls the dust off the side of the hole and will allow adhesion to happen there. Then fill the hole the right amount and put the bolt in properly (see Book of Installing Glue Ins for more).
You can blow the hole clean with a tube, just make sure its long enough your face isn't on the receiving end of all that dust. Cans of compressed air can be really handy. Chances are your brand of drill has a blower that is compatible with your batteries. Pumps such as Hilti's blow out pump are expensive but provide unlimited air since they are manual. Any NYLON wire brush that fits the hole works for brushing it clean. A metal wire brush could change the diameter of your hole if the rock is softer. If your hole is changing size just by brushing, you may need glue in bolts. Blowing AND brushing is how you make the hole completely clean.
Drill Bits
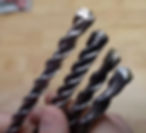
A 4-point bit drills a rounder hole which is required for some bolts such as the pricey but sexy Petzl Coeur Pulse removable bolts. They also have less vibration according to Boltahs Downunder's comparison VIDEO between bits. But 2-points bits are super good enough for almost every other bolt.
Fresh bits are important because the tip/shoulders get worn down on old bits and you get an undersized hole. If the hole is too small, then you have to smash your mechanical bolt in harder which can damage it or the glue in will not have as much glue surrounding the rod.
Battery-powered hammer drills and Petzl Rocpec hand drills require SDS-Plus drill bits, a “special direct system”. This type has the groves at the top so the drill can hammer and rotate the bit. Not all SDS bits are created equal. SDS-Plus is 10mm shank and SDS-Max is 18mm. So make sure you know what you are buying.
Size matters - the usable length and overall length are generally different by 2” because of the shank, or the part that goes into the drill. Remember that a 6” drill bit only has 4” that is usable.

1) Shank: has two sets of grooves so the bit doesn’t fall out and helps during hammering.
2) Land - raised portion of the spiral (similar to the crest or peak of a wave).
3) Flute - the spiral groove which facilitates the removal of the concrete dust as the hole is being drilled.
4) Head and Tip - these work together to break up the concrete. The carbide is brazed onto the head to harden the tip of the SDS bit to assist in the breaking of the concrete.
Super Size Me
Can you make a smaller hole bigger? Yes, you can use a 1/2" drill bit on a 3/8" hole to increase its size. This happens when rebolting and reusing holes as the original hole is often compromised. You can drill the smaller diameter longer and put in a longer bolt or you can increase the size for a larger mechanical bolt or to install a glue in bolt.
If you have limited expensive 1/2" bits, but a bunch of used 3/8" that have worn shoulders that aren't "good" anymore, you could predrill a 3/8" hole with the intention of "piloting" the hole, making it easier for your 1/2" drill bit. Or if the rock was so hard, it snapped off your only 1/2" carbide bit, you could drill with a 3/8" and then use your headless 1/2" to upsize the hole, hypothetically speaking of course. That was for a glue in that did NOT require a perfectly round hole btw.
Now if you go from 12mm to 1/2" (12.7mm) it risks binding up and your drill bit getting stuck. The diameters can't be too similar but it's fine if they are a 2mm difference (10mm to 12mm).
Know When To Wallow
Mechanical bolts are divas when it comes to hole size, having it round and not being wallowed out at the top. Some glue ins require notches which is an art in and of itself but you can do another trick for Bolt Products' Twisted Bolts which require no notch, but will slide in much easier if you enlarge the first inch (~ 3 cm) of the hole. We will hold back on the jokes there but feel free to let your mind wander. Just run your drill bit back and forth a few times over that first inch, while touching all sides of the hole. Alternatively, re-drill that first inch with the next size bit (e.g. go for a ø 13 mm bit if the bolt requires ø12 mm). The need for this arises out of the bolt construction. Close to the bolt's eye, the twisted rods have a small gap in between them. Enlarging the first inch is unnecessary if you are using imperial-sized drill bits (e.g. a ½ inch bit for a ø 12 mm bolt). These already create a hole which is larger than the requirement.

Bring Backups
It really sucks if you don’t have a backup drill/batteries or backup bit or backup glue tip or even backup hardware in case you miss counted or dropped one and you can’t finish bolting. The impact that bolts have on an area has been debated, but everyone agrees a half-drilled or half-installed bolt is bullshit.

Get an "inside" look at what the bolt looks like inside the hole in this episode.
Hand drilling
There are some places that do not allow power tools, such as National Parks in the USA. However, if it is legal and ethical to install bolts, you can do it the ol’ fashion way… by hand! Functions the same as rotary hammer drills. Except you provide the hit with a hammer and the turn with your wrist instead of a battery doing all the work.

1. You need a handle. The poor man’s method is to wrap duct tape around the shank until comfortable but the efficient way is to use a Petzl Rocpec, designed for SDS drill bits or the high quality D/5 Hurricane Drill which is designed for both SDS and HSS bits. If you want to learn how bad this sucks for only $27 you can buy a SDS max to SDS plus adapter because the max shank is huge and easy to hang onto.
2. You need a hammer… obviously. You can use any 12oz construction hammer but the Yosemite Hammer has an attachment cord and an eye to attach a carabiner for clipping and the occasional yanking.
3. Use gloves! The thicker the better for when you occasionally miss the head of the drill.

4. Use eye protection! You can literally feel things hitting you in the face when hammering a rock. You don’t want rock shards in your eyes. You can use sunglasses, which will make you look cooler when explaining you are trying to create a hole in granite the same way they did 200 years ago.
5. How long does it take? A ½” x 4.75” bolt hole takes approximately 1000 hits in hard Yosemite granite or an hour... if you are in your 20s. A shorter ⅜” x 2.75” can be only 20 minutes. Counting is a great way to keep the stoke high or fall into despair. Try to hit it at least 50x before resting your arm. Find and keep a rhythm to the hitting rather than pretending you are the road-runner on crack and getting tired 20 seconds later.
6. Keep it straight - As you get tired, you may have a tendency to not keep the drill straight. If the drill isn’t perfectly straight, it will be dragging against the sides of the hole and the friction that creates can really slow down momentum. It’s also very important to keep a drill straight so the hole stays true to size.

7. Don’t give it a courtesy tap, hit the drill with some umpf! You're not trying to make noise, you are trying to burrow a hole in the rock!
8. Keep the hole clean periodically. Maybe after 100 to 200 hits. If you don’t, you are just pounding dust… literally!
9. Use the most important resource on the planet… friends! If the anchor is safe to “hang out” at and easy access for everyone, take turns. Hitting 100x and switching can speed things up and not feel like such a burden.
10. Keep it attached to you. Wouldn’t it suck if your hammer or drill rolled off the cliff or fell out of your hands?
11. Use fresh bits. This is especially important for hand drilling. That extra $10 won’t seem like much if you are only half done after 1000 hits because you are using a worn-out bit.
Power drilling

1. Hammer drill vs rotary hammer drill - rock isn’t threatened by a normal drill spinning, you need a hammer drill. However, a normal “hammer drill” only has 2 cam/discs/gears spinning and tapping each other and is designed for “light masonry”. Unless you are drilling into some really poor quality rock, you will want a rotary hammer drill. Those have pistons which chisel the rock while spinning. Hammer drills have a normal chuck, in which a smooth shank fits and Rotary Hammer drills require SDS bits. You can buy Bosch or Makita, or Bobby Hutton’s favorite drills: Milwaukee’s LARGER DRILL has a great one too, used in this video or Milwaukee’s LIGHTER DRILL used in this video. Any brand works, and rumor has it even a harbor freight Bauer rotary hammer drill works super good enough. Read people's feedback on MP.

2. SDS Plus vs SDS Max - If you are buying something in a store, it’s really obvious that SDS Max is way overkill but if you order online and you have never heard of SDS before, then it’s good to know that you need SDS Plus. I ordered a scraper blade online once and when it came it was huge! All the drill bits that are 16mm / ⅝” or smaller, only require a SDS Plus size.

3. Keep it straight - it’s common for people to think a drill is straight and it be completely at an angle. With all the vibration and noise, you really have to be intentional to keep that drill perpendicular to the rock. There’s no fixing a hole drilled at an angle after you see the hanger doesn’t sit flush with the rock!

4. Check your work after the first 2 seconds of drilling. Make sure that it is where you want it. Don’t check once and drill twice. Let's avoid swiss cheese rocks by being mindful about checking our work.
5. Don’t push hard. Let the drill do the work.
6. Don’t be afraid to pull out. To help clear the debris, just pull the bit out periodically while it’s spinning. Not the entire time like you are trying to have sex with the rock, but you don’t want to just leave it in the hole for 3 straight minutes either.

BOLTAH DOWNUNDER IS A MUST WATCH FOR DRILLING INFO!
7. Know your batteries and bring enough. Don’t run out of juice and not be able to finish. Consider how the temperature can affect the batteries as well. When its cold out, your batteries could last noticeably less time.

8. Know your target length. Too deep for glue ins wastes glue. Too shallow for mechanical bolts and it takes rock surgery to fix it. Overdrilling a hole for a mechanical bolt can be helpful if in the future that bolt needs to be hammered in below the surface and covered with a dab of glue. Either way, be intentional about the depth and you can keep an eye on that with the measuring stick built into many drills called a “depth stop”. Or you could go fancy and put duct tape on the drill bit to identify the right depth. Just don’t drill too shallow, it can create major problems. Remember notched glue ins need to have a deeper hole than glue ins with no notch.
Here was a MP thread about an area that had all the wave bolts sticking out, and hammered down and looked terrible. This can be prevented with practice before doing an actual area. The assumption is they didn’t have the proper length drill bit and forgot a hammer and used a rock to smash them in and down. Please prep and practice before doing this to an area.

This german ARTICLE by frankenjura.com talks about an accident where the climbers sat on their top rope and under body weight broke a bolt that wasn’t in the rock deep enough, and landed on their belayer causing many injuries. You can see by their diagram the strain that was put on the bolt sticking out so far. The glue didn’t fail, it just snapped off. Holes must be deep enough so the bolts insert in all the way!
What's Next?

You can always go back to the main part of the BOLTING BIBLE HERE
Feedback, typos or more information is always appreciated. HMU at ryan@slackline.com
This course is free but not free to make. If it really helped you, please consider SUPPORTING US.